Sunday, January 11, 2015

Printing Multiple ABS Parts

multiple ABS parts printed "all at once"


Summary: Print ABS parts one at a time, not "all at once".


Lately I have been printing a lot in ABS to make some custom parts for my multirotor helicopter. When I need to print several copies of the same part, I have been using the "print all at once" option just as I did with PLA. With PLA, this setting allows time for each layer to cool and generally gives higher quality prints.

layer separation

However with ABS, I noticed some layer separation in my prints with printing with the "print all at once" setting. There were obvious gaps in some of the layers. With just a little pressure, the layers pulled apart very easily.

layers pulled apart

I think this is due to the fact that ABS shrinks some as it cools. Print continuously and the previous layer is still hot while the next layer is printed. But given extra time to cool, the previous layer shrinks before the next layer is printed and you end up with the layers not touching.

Luckily, print quality has not been an issue; it seems easier to get good prints with ABS. So the print all at once option does not seem to be necessary. I have been printing my ABS parts one at a time and the quality and strength are perfect.

Saturday, December 27, 2014

Figure Stands


One of my daughter's favorite gifts this Christmas was a fold-out school house book. The book opens up to make four classrooms and came with 18 paper figures to play with. Unfortunately, the paper stands that came with the figures were frustratingly flimsy. My daughter would spend 30 minutes getting her schoolhouse set up exactly as she wanted it. But as soon as she started playing, the figures would fall over like a class full of delinquents sending her into fits.

looks like Mrs. Ellie the art teacher
had one too many at lunch

So I decided to print some new stands for her figures. I took a few measurements. The paper was 0.44 mm thick; I made the slot 0.40 mm wide for a good friction fit. Then I drew up a quick design in 123D and printed out one test piece. It fit perfectly so I printed out 17 more.


Success! Now the class can stand at attention for Mrs. Meows and the set is much more fun to play with. The files are available on YouMagine and Thingiverse.

Sunday, December 14, 2014

Ultimate Jams!

uh oh!

Summary: Keep an eye on your prints in case something goes wrong. Things can get really messy, really fast. A little glue is cheap insurance for long or multiple prints.


No, I'm not talking about music here. This is what happens when your prints don't stick to the build platform. I was printing a bunch of spirograph gears. I had printed many sets before. So, confident that it would print without problem, I walked away from the printer and let it do its thing. I came back a while later to this...

bottom view of print head

One or more of the gears had slipped off of the build platform and stuck to the print head. The printer kept going, knocking off other gears. Eventually the nozzle got blocked by the parts, but the extruder kept going. The melted plastic oozed up around the nozzle and hot end engulfing both. It looked like a total nightmare to clean.

this is what was stuck to the print head.

I peeled the mass of plastic off of the print head before it cooled down. But there was still a big mess of melted plastic surrounding the hot end up inside the fan shroud. I though I would have to disassemble the entire print head to clean it. After closer inspection I could see that the fan shroud is attached by four allen screws on the outside of the print head.

one of the screws holding the fan shroud on

mess of PLA around the hot end

Once I removed the fan shroud I could see it wasn't as bad as I thought. I turned on the machine and used the advanced settings to heat up the nozzle to about 190°C; hot enough to melt the plastic, not so hot that it burns or makes a bigger mess. I gently pulled on the mass of PLA with pliers until it came off easily. With the nozzle still not, I wiped off the hot end and used a dental pick to remove the last little bits of PLA from around the nozzle threads.

all clean and extruding properly

With the hot end all clean, I advanced the extruder to make sure the nozzle wasn't clogged. The PLA flowed nicely so I screwed the fan shroud back on. I printed the gears again, this time using glue on the build platform. They printed perfectly. Even if you may not need it, use glue to make absolutely sure your prints don't come loose.

Friday, December 12, 2014

Cable Holder


Summary: Original design of a cable clip to keep your charging cables off of the floor. 

There are a lot of portable electronics in my house, each with its own charging cable. Whenever one of them is unplugged, the cable falls to the floor. Not only is it annoying to have to fish the cable off the floor from behind furniture, the house is starting to look like the snake pit from Indiana Jones with cables winding all over the place!

these clips from Thingiverse were way too big, 32 mm in diameter

I thought it would be easy enough to print a cable holder that would keep the cable end on top of my furniture. I tried a few designs from Thingiverse but I couldn't find any that I liked. Some were too large, others had gaps that were too wide and the cable would fall out. So I decided to make my own.

looks nice but cable slips out of gap

It turned out to be a little harder than I expected. It turns out, each charging cable had a different diameter. So if I designed a holder for a thicker cable, anything smaller would fall out. If I designed the gap for a smaller cable, I couldn't fit the thicker cables. I tried closing the gap down and making the sides thin enough to flex. That way you could bend the clip to insert the cable and the gap would close. But I was afraid the sides would crack and I didn't like the look of any of those designs.

my flexible design...meh

Finally I decided that I needed a design that snapped shut to completely enclose the cable. That way it would work with any size charging cable. Rather than go with the same hemisphere design as everyone else, I went with a cube. It took a couple of tries to get the snap feature correct; tight enough to hold together, loose enough to snap. But the final design works great. First time assembly is a little tight, but it smooths out after a few times. The orientation of the layers actually locks the halves together and keeps the pieces from sliding apart.

the Cable Box™

two halves print at same time

I named it the Cable Box™ after the shape. I made four versions to hold 1 to 4 cables. It is 12 mm square and has a 6 mm hole which should fit most charging cables. You attach it to surfaces with foam tape. The halves are a single .stl file but are separated on the build platform. So they print at the same time regardless of your "print one at a time" setting in Cura.
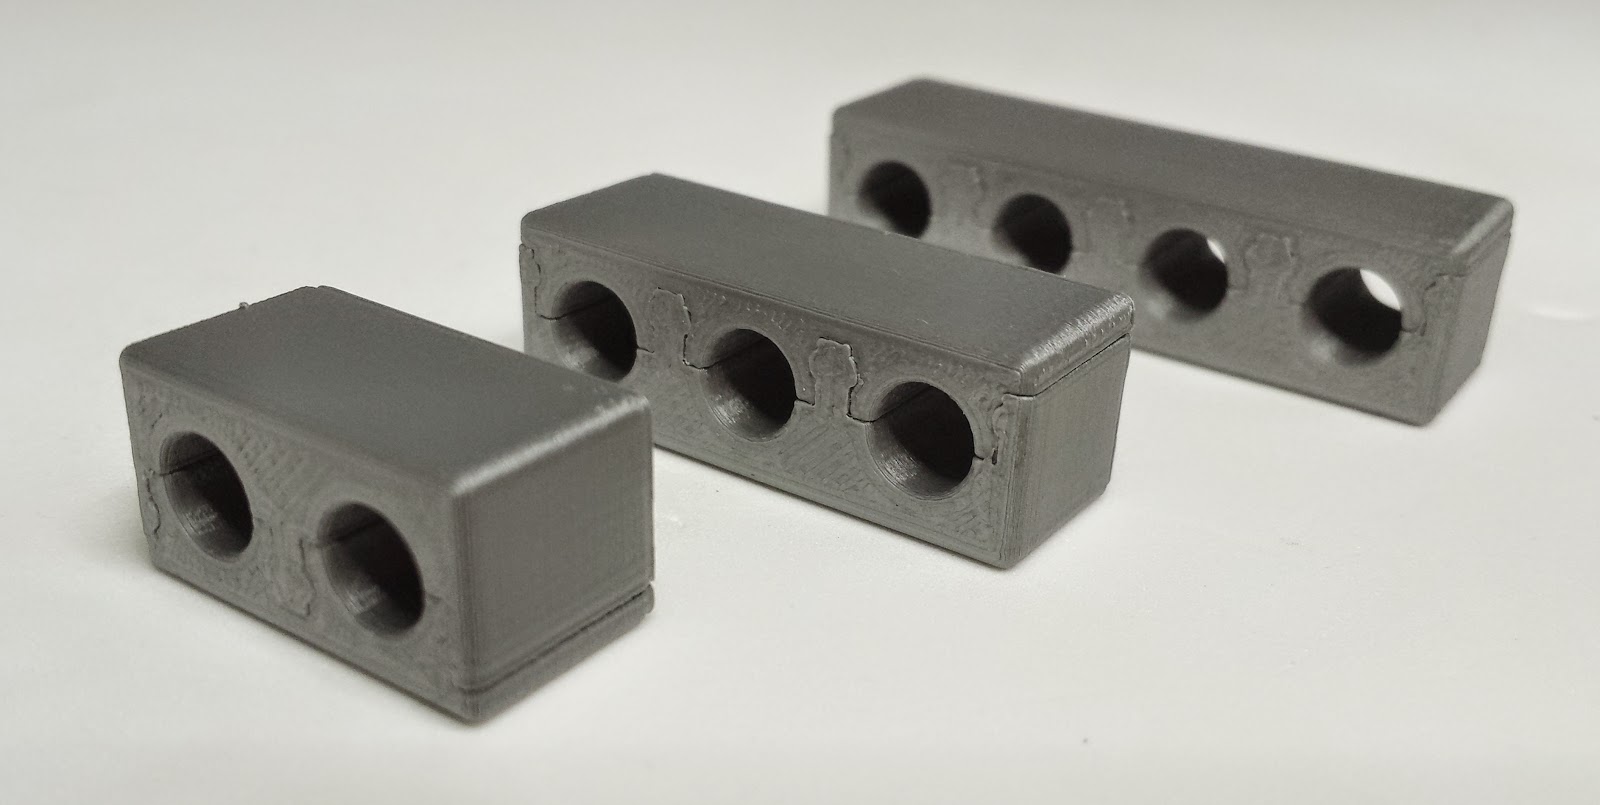

designs for 2-4 cables

Cable Box ™ in action

I printed these in PLA at 210°C with the High Quality defaults. The design works great; looks pretty good too. I'm proud of the snap-together feature. I wasn't sure I could pull that off. I'll be printing a bunch of these for my house. If you want some for your house too, the files are available on YouMagine and Thingiverse.

Wednesday, December 10, 2014

Maintenance Time!

these lines should be touching

Summary: Tighten your belts and lube the rods every 120 hours or whenever your print lines drift apart.

I just hit 120 hours of printing on my UM2. My last print was going to be a long 19+ hours. So you can imagine my despair when I noticed the first few layers weren't looking too good. There were noticeable spaces between the lines. I was printing with the normal quality defaults where the initial layers print nice and slow. It wasn't an issue of my print settings being too aggressive. The filament wasn't skipping and the lines were uniform, just not touching. So it didn't seem to be a case of under extrusion. I wasn't going to chance ruining a long print, so I aborted after just a few layers to troubleshoot.


Once again, I went to my favorite troubleshooting guide. I found the solution here. It looks like after so many hours of printing, either the belts have stretched a little, or the stepper motors have drifted in their slotted mounting holes. Luckily it is an easy fix. Simply loosen the screws for the stepper motors, apply downward pressure, and tighten the screws. Oddly enough, none of the included Allen keys fit the bolts properly (they're 2 mm). It took me longer to find the correct driver than it did to tighten the belts. While I was at it, I added a drop of silicone oil to the X and Y guide rods on the print head. Then I manually moved the print head to all extremes to distribute the oil.

initial layer after adjustments

That did the trick. Right after the maintenance, I started the print again. This time the lines were touching as expected. I was a little surprised at the improvement since the belts felt nice and tight before I adjusted them. I think Ultimaker should consider some sort of tensioner on each stepper to keep things tight. With all of the work those steppers are doing, it seems inevitable that the motors will drift some in the mounts. So just a little preventive maintenance can save you from lousy prints.

The Spiralize Setting

standard print (L) vs. spiralized print (R)

Summary: Use the "spiralize" setting for seamless walls on hollow prints like vases and cylinders.


I saw some really nice rocket models on Thingiverse. The designer recommended printing them in "vase mode". That is a mode for printing cylinders, where the table (z axis) continuously lowers as the print progresses rather than lowering in steps. That way, the print head can just go round and round without pausing when the bed lowers. It makes for seamless prints.

location of the spiralize setting

I looked in the Cura settings and couldn't find a "vase" or "continuous Z" mode. So I asked on the UM forum and found out that there is an option to "spiralize the outer contour" in the expert configurations which does the same thing. To test it out I decided to print the twin cylinder file I have been using to test print temperature. When printing in the normal Z mode, it leaves a visible vertical seam. I split the model so I could print just one cylinder. First I printed the cylinder in the normal mode. Then I repeated the print using the spiralize setting.

note the vertical seam from a standard print

inside view, spiralized print on right

The spiralize setting made nice clean cylinders with no vertical seams on the outside or inside. The internal quality is just as important when printing something you want to shine light through. Once I tested the setting on the cylinders, I printed the rocket model at .69 scale (just to save time and material). The setting worked great. I printed a little too hot and the tip of the rocket drooped a bit and there are some blobs inside the print. But there is no vertical seam. Just another great feature of Cura that you may have missed.

spiralized rocket print

lighted print

Monday, December 8, 2014

Pen Holder


I like to collect all-metal pens. I have a small collection that I would like to display on my desk rather than have them hiding in a drawer. I figured I could print a nice one but I was not able to find a design that I liked. A few days ago, I came across a design by Karas Customs on Kickstarter. I loved the look of it, but I couldn't justify the $75 price tag just to hold my pens. So I decided to draw up something similar in CAD and print it.

design in 123D Design

Drawing the holder was pretty easy. It is just a cube with 9 holes in it. But I wanted to add a custom touch, my company logo embossed on one of the sides. With my limited CAD experience, that turned out to be a bit more difficult than I expected. I am sure there are easier ways to do this, but here's how I did it.

sketching over stl object

First I opened a .png of the logo in Cura and created an .stl object just as I described in this post. Then I opened the new .stl file in 123D Design. The file had way too many faces and I couldn't manipulate the object to extrude it. So I lowered the object below the plane and manually traced a new sketch on top of it. Then I deleted the object and just saved the new sketch. Next I opened the pen holder file in 123D and inserted the new sketch.

sketch of logo with holder

Finally, I just moved the sketch into position, scaled it to fit, and extruded it into the pen holder. Then I exported the file as an .stl so I could open it in Cura and print. It sounds easy enough but it took me several tries to get the workflow correct. Again, there is probably a more efficient way to do this, but this worked for me. Like the original, I added some recesses in the bottom for rubber feet.

final design in Cura

I printed it out at the normal quality defaults. After 19+ hours, I had a really nice holder for my pen collection. It's  not as sexy as the original but I really like it and the logo adds a nice personal touch.